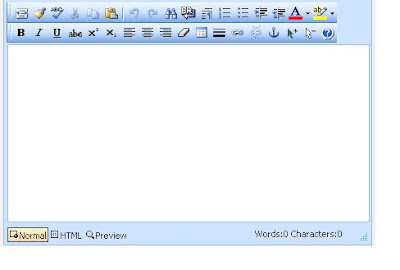
Cute Editor comes with some default set of toolbar configurations like - Simple, Full, Compact Minimal etc, which may full fill your requirements. But in case the entire vendor provided toolbars do not meet your needs and you want to have a certain set of tools\buttons on your editor, you can do it by simply creating your own configuration XML.
- Tools are maintained in simple XML config files, loacted at ~\CuteSoft_Client\CuteEditor\Configuration\AutoConfigure folder.
- To create a new configuration file, copy an existing config file, i.e. Simple.config and re-name it "MyTools.config". Save it to ~\CuteSoft_Client\CuteEditor\Configuration folder.
- Code of the configuration file would be as per our tools requirements as below:
- Now you have created your own toolbar for Cute Editor, you can simply use it on .aspx page by changing following code line in cute editor definition on page:
<CE:Editor ConfigurationPath="~/CuteSoft_Client/CuteEditor/Configuration/mytools.config"
id="Editor1"
runat="server" >
</CE:Editor> - Your Editor will render on your page like below :
<?xml version="1.0" encoding="utf-8" ?>
<configuration>
<codeviewToolbars>
<item type="g_start" />
<item type="image" name="Save" postback="True" />
<item type="image" name="Print" />
<item type="image" name="Find" />
<item type="image" name="ToFullPage" command="FullPage" imagename="fit" hotkey="F12" />
<item type="image" name="FromFullPage" command="FullPage" imagename="restore" hotkey="F12" />
<item type="image" name="Cut" />
<item type="image" name="Copy" />
<item type="image" name="Paste" />
<item type="image" name="SelectAll" hotkey="CTRL+A" />
<item type="image" name="SelectNone" />
<item type="g_end" />
</codeviewToolbars>
<toolbars>
<item type="g_start" />
<item type="image" name="ToFullPage" command="FullPage" imagename="fit" hotkey="F12" />
<item type="image" name="FromFullPage" command="FullPage" imagename="restore" hotkey="F12" />
<item type="image" name="CleanCode" imagename="cleanup" />
<item type="image" name="NetSpell" imagename="spell" />
<item type="image" name="Cut" />
<item type="image" name="Copy" />
<item type="dropmenu" name="Paste" group="PasteGroup"/>
<item type="separator" />
<item type="image" name="Undo" />
<item type="image" name="Redo" />
<item type="image" name="Find" />
<item type="image" name="Break" />
<item type="image" name="InsertParagraph" imagename="Paragraph" />
<item type="image" name="InsertOrderedList" imagename="numlist" />
<item type="image" name="InsertUnorderedList" imagename="bullist" />
<item type="image" name="Indent" />
<item type="image" name="Outdent" />
<item type="forecolor" />
<item type="backcolor" />
<item type="g_end" />
<item type="g_start" />
<item type="image" name="Bold" />
<item type="image" name="Italic" />
<item type="image" name="Underline" imagename="under" />
<item type="image" name="StrikeThrough" imagename="strike" />
<item type="image" name="Superscript" />
<item type="image" name="Subscript" />
<item type="image" name="JustifyLeft" imagename="left" />
<item type="image" name="JustifyCenter" imagename="center" />
<item type="image" name="JustifyRight" imagename="right" />
<item type="image" name="RemoveFormat" imagename="unformat" />
<item type="table" />
<item type="image" name="InsertHorizontalRule" imagename="rule" />
<item type="image" name="InsertLink" imagename="link" />
<item type="image" name="Unlink" />
<item type="image" name="InsertAnchor" imagename="anchor" />
<item type="image" name="SelectAll" hotkey="CTRL+A" />
<item type="image" name="SelectNone" />
<item type="image" name="Help" />
<item type="g_end" />
<!-- groups are defined in Shared/Common.config -->
</toolbars>
</configuration>

No comments:
Post a Comment