Monday, February 8, 2010

Error - Attempted to perform an unauthorized operation

I’ve faced a problem while trying to deploy a webpart created in Visual Studio 2008 with Sharepoint webparts template. I did the coding and build the project without any problem, but when tried to deploy it using visual studio, Build -> Deploy Solution, it had thrown an error “Attempted to perform an unauthorized operation।”


Reason: The possible problem is that you are trying to deploy solution on a site to which you don't have authorization to deployment.


Solution: Check the URL to which you are deploying the solution, by default it is http://localhost/ , change it to your site where you actually want to deploy the webpart.
Go to the project properties and inside the debug tab select the start action as 'start browser with url' and enter the valid site collection URL।


Though, there may be different reasons of this error because of any other authorization failure, this is also a main reason. Hope this fix might help.

Tuesday, February 2, 2010

Play Media in ASP.NET Site

This is one of the basic requirements of a site; you may want to play a media file or a play list (group of media files). Here are few simple steps to create a web page with media player on it.

1. Open Visual Studio 2005\2008
2. File -> New ->Website, Give this site a name, like MySite
3. Create a new folder under your site, Right Click on site -> New Folder, name it Videos.
4. Copy all the media files you want to play on site.
5. Create a playlist, Right click on Videos folder -> Add New Item -> Text File -> Name it Playlist.m3u
6. Open the Playlist.m3u file and provide list of files with relative location in this, each file in new line. I.e. -
/MySite/Videos/Evian.wmv
/MySite/Videos/Too_Good.mpeg
7. Now, open the Default.aspx page, and add following code in <div> or <table> as per you site layout:
<object id="MediaPlayer1" width="360" height="400" classid="CLSID:22D6F312-B0F6-11D0-94AB-0080C74C7E95"
codebase="http://activex.microsoft.com/activex/controls/mplayer/en/nsmp2inf.cab#Version=5,1,52,701"
standby="Loading Microsoft® Windows® Media Player components..." type="application/x-oleobject"
style="text-align: center;">
<param name="FileName" value="Videos/Playlist.m3u" />
<param name="loop" value="True" />
<param name="ShowStatusBar" value="True" />
<param name="DefaultFrame" value="mainFrame" />
<param name="autostart" value="true" />
</object>
8. Save the file and Run this site. It will play the playlist provided.

Note- if you want to play just a single file in Media Player, just replace the line
<param name="FileName" value="Videos/Playlist.m3u" />
With line
<param name="src" value="Videos/Too_Good.mpeg" />

Happy Coding!!!

Monday, February 1, 2010

MOSS - Configure E-mail

In MOSS site there is built-in functionality for sending\receiving mails for alerts, workflows, events etc. Here are simple steps to configure e-mail on Sharepoint server through Sharepoint Central Administrator.

Configure incoming e-mail
You can configure incoming e-mail settings so that SharePoint sites accept and archive incoming e-mail. You can also configure incoming e-mail settings so that SharePoint sites can archive e-mail discussions as they happen, save e-mailed documents, and show e-mailed meetings on site calendars. In addition, you can configure the SharePoint Directory Management Service to provide support for e-mail distribution list creation and management.
To enable incoming e-mail by using automatic mode, you must install the Internet Information Services (IIS) Simple Mail Transfer Protocol (SMTP) server.
By specifying a drop folder, you can enable incoming e-mail by not using an SMTP server.
1. On the top navigation bar, click Operations.
2. On the Operations page, in the Topology and Services section, click Incoming e-mail settings.
3. If you want to enable sites on this server to receive e-mail, on the Incoming E-mail Settings page, in the Enable Incoming E-Mail section, select Yes.
4. Select either the Automatic or the Advanced settings mode.
If you select Advanced, you can specify a drop folder instead of using an SMTP server.
1. If you want to connect to the SharePoint Directory Management Service, in the Directory Management Service section, select Yes.
You can connect to the SharePoint Directory Management Service for SharePoint sites to manage e-mail addresses in SharePoint lists.
1. In the Directory Management Service URL box, type the URL of the SharePoint Directory Management Service.
2. In the E-mail server display address box, type the e-mail server name (for example, mail.sharepoint.fabrikam.com).
3. Answer the following two questions by selecting Yes or No:
· Does the Directory Management Service manage distribution lists?
· Should distribution lists accept mail only from authenticated senders?
4. In the Incoming E-Mail Server Display Address section, type a display name for the e-mail server (for example, mail.fabrikam.com) in the E-mail server display address box.
Tip You can specify the e-mail server address that is displayed when users create an incoming e-mail address for a list or group. Use this setting in conjunction with the SharePoint Directory Management Service to provide an e-mail server address that is more user-friendly.
1. In the Safe E-Mail Servers section, select one of the following options:
· Accept mail from all e-mail servers
· Accept mail from these safe e-mail servers. If you select this option, type the IP addresses (one per line) of the e-mail servers that you want to specify as safe in the corresponding box.
2. In the E-mail Drop Folder section, in the E-mail drop folder box, type the name of the folder in which Microsoft Windows SharePoint Services polls for incoming e-mail from the Windows SMTP Service.
This option is available only if you selected advanced mode.
Click OK.

Configure outgoing e-mail settings

You can configure outgoing e-mail settings so that your Simple Mail Transfer Protocol (SMTP) server sends e-mail alerts to site users and notifications to site administrators. You can configure both the "From" e-mail address and the "Reply" e-mail address that appear in outgoing alerts.
Configure outgoing e-mail
Configure default outgoing e-mail settings
Configuring the default outgoing e-mail settings configures the default outgoing e-mail settings for all Web applications.
1. On the top navigation bar, click Operations.
2. On the Operations page, click Outgoing e-mail settings in the Topology and Services section.
3. On the Outgoing E-Mail Settings page, in the Mail Settings section, type the Simple Mail Transfer Protocol (SMTP) server name for outbound e-mail (for example, mail.example.com) in the Outbound SMTP server box.
4. In the From address text box, type the from address as you want it to appear to e-mail recipients.
5. In the Reply-to address box, type the e-mail address to which you want e-mail recipients to reply.
6. In the Character set menu, select the character set appropriate for your language.
7. Click OK.


Configure outgoing e-mail settings for a Web application
You can override a Web application's default settings for outgoing e-mail.
1. On the top navigation bar, click Application Management.
2. On the Application Management page, click Web application outgoing e-mail settings in the SharePoint Web Application Management section.
3. On the Web Application E-Mail Settings page, select a Web application by using the Web Application menu in the Web Application section.
4. In the Mail Settings section, type the SMTP server name for outbound e-mail (for example, type mail.fabrikam.com) in the Outbound SMTP server box.
5. In the From address box, type the e-mail address as you want it to appear to e-mail recipients.
6. In the Reply-to address box, type the e-mail address to which you want e-mail recipients to reply.
7. On the Character set menu, click the character set that's appropriate for your language.
8. Click OK.

Cute Editor - Customize Toolbar

Cute Editor comes with some default set of toolbar configurations like - Simple, Full, Compact Minimal etc, which may full fill your requirements. But in case the entire vendor provided toolbars do not meet your needs and you want to have a certain set of tools\buttons on your editor, you can do it by simply creating your own configuration XML.

  • Tools are maintained in simple XML config files, loacted at ~\CuteSoft_Client\CuteEditor\Configuration\AutoConfigure folder.
  • To create a new configuration file, copy an existing config file, i.e. Simple.config and re-name it "MyTools.config". Save it to ~\CuteSoft_Client\CuteEditor\Configuration folder.
  • Code of the configuration file would be as per our tools requirements as below:


  • <?xml version="1.0" encoding="utf-8" ?>
    <configuration>
    <codeviewToolbars>
    <item type="g_start" />
    <item type="image" name="Save" postback="True" />
    <item type="image" name="Print" />
    <item type="image" name="Find" />
    <item type="image" name="ToFullPage" command="FullPage" imagename="fit" hotkey="F12" />
    <item type="image" name="FromFullPage" command="FullPage" imagename="restore" hotkey="F12" />
    <item type="image" name="Cut" />
    <item type="image" name="Copy" />
    <item type="image" name="Paste" />
    <item type="image" name="SelectAll" hotkey="CTRL+A" />
    <item type="image" name="SelectNone" />
    <item type="g_end" />
    </codeviewToolbars>

    <toolbars>
    <item type="g_start" />
    <item type="image" name="ToFullPage" command="FullPage" imagename="fit" hotkey="F12" />
    <item type="image" name="FromFullPage" command="FullPage" imagename="restore" hotkey="F12" />
    <item type="image" name="CleanCode" imagename="cleanup" />
    <item type="image" name="NetSpell" imagename="spell" />
    <item type="image" name="Cut" />
    <item type="image" name="Copy" />
    <item type="dropmenu" name="Paste" group="PasteGroup"/>
    <item type="separator" />
    <item type="image" name="Undo" />
    <item type="image" name="Redo" />
    <item type="image" name="Find" />

    <item type="image" name="Break" />
    <item type="image" name="InsertParagraph" imagename="Paragraph" />
    <item type="image" name="InsertOrderedList" imagename="numlist" />
    <item type="image" name="InsertUnorderedList" imagename="bullist" />
    <item type="image" name="Indent" />
    <item type="image" name="Outdent" />
    <item type="forecolor" />
    <item type="backcolor" />
    <item type="g_end" />

    <item type="g_start" />
    <item type="image" name="Bold" />
    <item type="image" name="Italic" />
    <item type="image" name="Underline" imagename="under" />
    <item type="image" name="StrikeThrough" imagename="strike" />
    <item type="image" name="Superscript" />
    <item type="image" name="Subscript" />
    <item type="image" name="JustifyLeft" imagename="left" />
    <item type="image" name="JustifyCenter" imagename="center" />
    <item type="image" name="JustifyRight" imagename="right" />
    <item type="image" name="RemoveFormat" imagename="unformat" />

    <item type="table" />
    <item type="image" name="InsertHorizontalRule" imagename="rule" />
    <item type="image" name="InsertLink" imagename="link" />
    <item type="image" name="Unlink" />
    <item type="image" name="InsertAnchor" imagename="anchor" />
    <item type="image" name="SelectAll" hotkey="CTRL+A" />
    <item type="image" name="SelectNone" />
    <item type="image" name="Help" />
    <item type="g_end" />

    <!-- groups are defined in Shared/Common.config -->
    </toolbars>
    </configuration>


  • Now you have created your own toolbar for Cute Editor, you can simply use it on .aspx page by changing following code line in cute editor definition on page:

    <CE:Editor ConfigurationPath="~/CuteSoft_Client/CuteEditor/Configuration/mytools.config"
    id="Editor1"
    runat="server" >
    </CE:Editor>

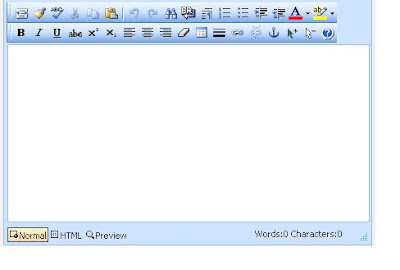
  • Your Editor will render on your page like below :